The development of backpacks focuses on integrating functionality, appearance, and fashion trends. Growing innovations have led to smart backpacks that include GPS, charger ports, massagers and speakers, eco-friendly materials, and improved performance like weather-resistant, cooling, and anti-theft. Some of the brands in this segment are Deuter, Everest, Goruck, JanSport, Monarc, Osprey, Patagonia, Polestar, Reebok, Samsonite, Swiss Gear, Targus, The North Face, Timbuk2, and Wildcraft.
In this article, I have covered the backpack manufacturing process in brief, while touching upon the following topics.
- Different types of backpacks
- Components of a backpack
- Materials used in backpack manufacturing
- Backpack manufacturing process flow
- Production of a backpack in mass production (CMT)
Different Types of backpack
The market segments of backpacks as per their types are – student/work bags, outdoor sports and recreation bags, and travel bags.
The typical features of a backpack are:
- Adequate room to carry essentials (volume of the backpack)
- Compartments and pockets to organize the items
- Water-resistant
- Lightweight
- Resistant to cuts and rips
- Padded back panel
- Padded shoulder straps
- Adjustable belts
- Mesh fabric back panel
- Additional functions – anti-theft, USB charging, etc.
Components of a backpack
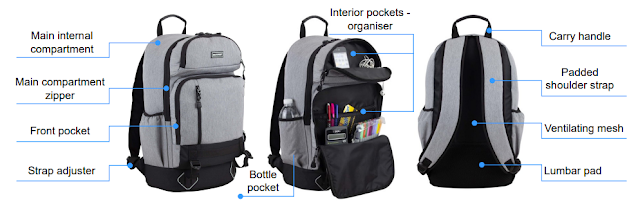
The anatomy of a backpack depends on its design, type, and use of it. Depending on the backpack design, one needs to procure raw materials. They need to do production planning. The basic parts that make up backpacks are:- Padded shoulder straps
- Strap adjusters
- Front pocket
- Side bottle pocket
- Main internal compartment
- Main compartment zipper
- Top grab/ carry handle
- Ventilating mesh
- Lumbar pad
- Interior pockets
- Piping/ trim

Figure 4: Components of a basic backpack
Materials used in backpack manufacture
The commonly used materials in backpacks are nylon and polyester, with nylon dominating the global market. Nylon is usually considered the most durable backpack material and is thus suitable for outdoor use. Other materials include cotton (canvas and denim), jute, hemp and leather. Brands have also launched products with 100% recycled material. Below are a few images showing backpacks made from these materials.
Backpack manufacturing process flow
The overall process of manufacturing a backpack is very similar to that of a garment. It involves material sourcing, product development and sampling, time study, line set-up, cut-make-trim, quality inspection, and packaging. The basic steps of cut-make-trim are as follows:
1. Cutting of backpack parts
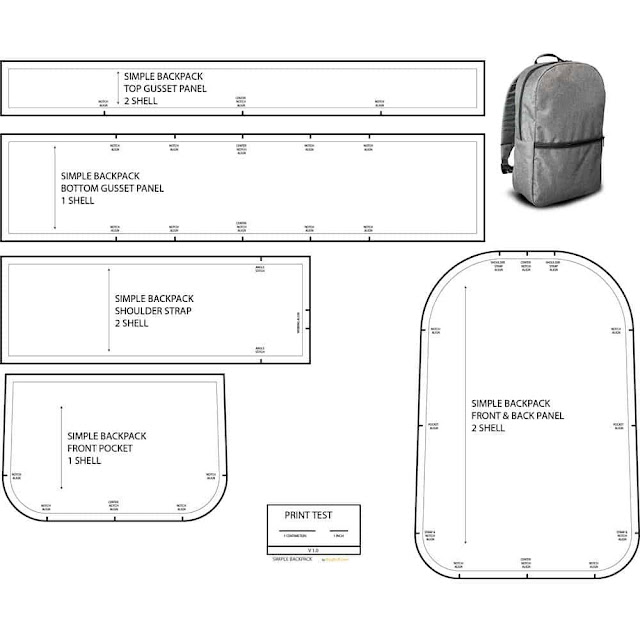
On finalizing the template, the pattern is drawn on the computer to develop the marker. The template of a simple backpack is shown in Figure 11. The number of cut components for a backpack can go up to hundreds.
Figure 11: Template of a basic backpack
The spread fabric is cut using either CNC cutting, knife cutting, die cutting, or laser cutting. Die cutting is more common in backpack manufacturing.

Figure: 12: Die cutting
The panel that will contain the logo/ design is sent for printing or embroidery.

Figure 13: Computerised multi-needle multi-head machines for embroidery
Along with the body fabric, the team also makes the lining material and other trims ready. The cut components are then fed to the sewing lines.
2. Backpack Stitching process
Backpack manufacturing is done in assembly lines. A simple backpack can consist of up to 30 operations in a single line, while complicated designs have a higher number of operations. The lines accommodate inter-modular sections that carry out the additional procedures.The operations involved in backpack manufacturing are given in the table below.
Note: The table only covers sample operation steps. The operations would be different as per the design of the backpack.
List of
operations involved in manufacturing a backpack (example)  |
|
|
Operation
No. |
Operation |
|
A |
Making
the front panel |
|
1 |
Binding the upper seam of the front panel lining |
|
2 |
Basting the front panel |
|
3 |
Basting and top stitch zipper to the front pocket |
|
4 |
Basting pocket lining to the front panel |
|
5 |
Top stitch the upper section of the front panel |
|
6 |
Binding the side and lower sections of the front
panel |
|
7 |
Basting and top stitching the bottom section of the
front panel |
|
8 |
Attaching the internal lining to the front panel
(stitch on all sides) |
|
B |
Gusset |
|
9 |
Adding glue behind the edges of pockets on the
gusset |
|
10 |
Folding the cut edges to create a clean border for
the pockets |
|
11 |
Attaching pocket zippers to the lining |
|
12 |
Basting and top stitch the zippers to the front
gusset |
|
13 |
Preparing the top pocket bag by stitching the lining |
|
14 |
Preparing side pocket bag by seam sealing neoprene |
|
15 |
Basting top pocket lining to the gusset |
|
16 |
Basting neoprene side pocket to the gusset |
|
17 |
Attaching a flag label to the second side pocket |
|
18 |
Binding the sides of the second side pocket |
|
19 |
Basting and top stitch the second side pocket to the
gusset |
|
20 |
Attaching
pen holder on the internal lining using a programmable pattern sewing machine |
|
21 |
Sewing
together sections of the internal lining |
|
22 |
Basting and top stitch the main compartment zipper
to the back gusset |
|
23 |
Basting zipper flap to the main zipper |
|
24 |
Basting internal lining to the main zipper |
|
25 |
Attaching the internal lining and main zipper to the
front gusset |
|
26 |
Top stitch the main zipper flap |
|
C |
Handles |
|
27 |
Stitching interlining to the handle fabric on one
shorter side |
|
28 |
Binding the handle fabric on one longer side |
|
29 |
Using
a folder binder attachment, sew a long strip |
|
30 |
Cutting the strip into sections to make the handle
straps |
|
31 |
Folding into half and stitching on the edge of the
handle strap |
|
32 |
Adding foam to the handle and connecting it to the
handle strap |
|
33 |
Applying glue to hold the handle together for more
accurate sewing |
|
34 |
Stitching the handle strap inside the handle |
|
35 |
Preparing and stitching the handle loop |
|
36 |
Adding magnetic press studs on the handle loop |
|
37 |
Closing the gusset lining and attaching the handles |
|
38 |
Attaching the bottom base with the sides of the
gusset |
|
C |
Back
Panel and Shoulder Strap |
|
39 |
Quilting
the linings with sponge/ foam using a computerised pattern sewing machine |
|
40 |
Preparing internal pockets |
|
41 |
Stitching internal pockets onto the inside panel |
|
42 |
Assembling the shoulder straps |
|
43 |
Basting shoulder strap with mesh |
|
44 |
Adding reinforcements where shoulder straps connect
to the back body |
|
45 |
Adding
sponge/ foam inside the shoulder straps (between fabric and mesh) while
turning them outside-in |
|
46 |
Top stitch on the shoulder strap |
|
47 |
Attaching
shoulder straps to the back panel using a programmable pattern sewing machine |
|
48 |
Stitching
a cover at the joint of the shoulder strap |
|
49 |
Basting
foam and lining for the back panel |
|
50 |
Attaching
the laptop compartment zipper to the back panel |
|
51 |
Stitching
together the back panel with internal lining and laptop compartment zipper at
the top |
|
52 |
Top
stitching around laptop compartment zipper |
|
53 |
Stitching
luggage strap |
|
54 |
Top
stitch shoulder strap webbing and back panel with internal lining on sides
and bottom |
|
55 |
Attach
the laptop bumper pad to the bottom of the inside panel |
|
56 |
Stitching
together the back panel and inside panel |
|
E |
Assembly |
|
57 |
Attaching front panel to side panels |
|
58 |
Attaching the back panel to the laptop sleeve |
|
59 |
Adding bar tack to reinforce shoulder strap webbing |
|
60 |
Adding internal binding around exposed seams along
with brand label |
|
61 |
Turning the bag inside-out |
Simple industrial sewing machines, special machines with attachments, and heavy-duty machines make up a backpack sewing line. For example, computerized pattern sewing machines, machines equipped with binding/ tape sewing attachments, double-needle post-bed machines, bar tack machines, rivet press machines, seam sealing machines, etc.
3. Finishing process
During (inline) and after the sewing process (end of the line), the product undergoes several checks in accordance to set quality guidelines. The checker segregates defective pieces into small repairs, major repairs, and rejects. The final steps involve cutting loose threads, removing marks or stains from the material, checking for broken needles, and finally packaging it.The quality inspector checks the backpacks for their material, measurement, workmanship, print, embroidery, trims and accessories, etc. The quantity of the products as well as packaging are checked as they are loaded into shipment containers.
Conclusion:
This post is an introduction to backpack manufacturing. It would help you get an overall idea of the process. We are happy to help if you have any questions related to backpack manufacturing. You can send us your questions/queries at prasanta[@]onlineclothingstudy.comReferences:
- https://www.expertmarketresearch.com/reports/backpack-market
- https://www.tripsavvy.com/best-backpack-brands-4781448
- https://ripstopbytheroll.com/products/simple-series-backpack-template

